Thursday, September 23, 2010

KVM Memory/CPU Benchmark with NUMA

Executive Summary:


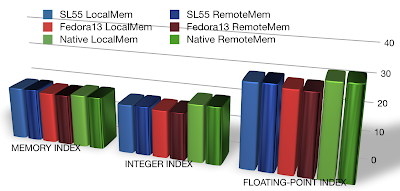
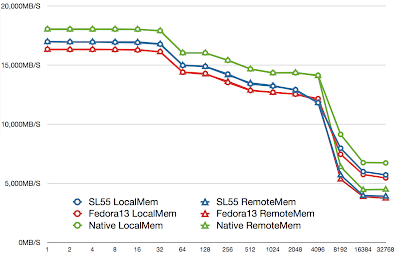
1. In all platforms, accessing local memory is much FASTER than accessing remote memory, so pinning CPU/Memory to VM is mandatory.

2. Native CPU/Memory performance is better than inside VM, but not much.

3. SL55 slightly outperform Fedora13, the newer kernel shouldn't perform worse than the old one, so this point is not understood.


Host Platform: Fedora 13, 2.6.34.7-56.fc13.x86_64
Host Computer: Nehalem E5520, HyperThreading Off, 24GB Memory (12GB each node)

Guest Platform 1: Scientific Linux (RHEL, CentOS) 5.5 64-bit, 2.6.18-194.3.1.el5
Guest Platform 2: Fedora 13 64-bit, 2.6.34.7-56.fc13.x86_64

Test Software:

1. nBench, gives basic CPU benchmark. http://www.tux.org/~mayer/linux/nbench-byte-2.2.3.tar.gz
Command Used: nbench

2. RAMSpeed, gives basic RAM bandwidth. http://www.alasir.com/software/ramspeed/ramsmp-3.5.0.tar.gz
Command Used: ramsmp -b 1 -g 16 -p 1

3. Stream, gives basic RAM bandwidth. http://www.cs.virginia.edu/stream/
Parameter Used: Array size = 40000000, Offset = 0, Total memory required = 915.5 MB. Each test is run 10 times.

Test Scenarios (2 by 3 = 6 Scenarios in total):
3 Platforms: Native, Fedora 13 in VM and SL55 in VM
2 Memory Access patterns per Platform: Local Memory and Remote Memory.
So in total 3*2 = 6 Scenarios.

3 Tests are performed for each of the above 6 scenarios.


Test Methods:
1. For KVM virtual machines, the CPU/Memory pinning are set via the CPUSET kernel functionality. See the other post for details.
2. For Native runs, CPU/Memory pinning are done with numactl. E.g.
Locally run nbench with cpu #0 and only allocate memory in node 0 (where cpu#0 is).
numactl --membind 0 --physcpubind 0 ./nbench

Remotely run nbench with cpu #0 and only allocate memory in node 1 (where cpu#0 is at node 0).
numactl --membind 1 --physcpubind 0 ./nbench

Test Results:


1. nBench:


2. RAMSpeed


3. Stream

How to pin CPU/Memory Affinity with CPUSET (Host Kernel 2.6.34)

Note: Below were tested on the host system of Fedora 13 with kernel 2.6.34.7-56.fc13.x86_64.

This post demonstrates how to use CPUSET to pin a process (including a KVM process) to a certain core and memory unit in a NUMA system. The goal is to let the CPU always access local memory thus save time in memory traffic. The memory performance is very different in fact (see the other post for memory/cpu benchmark).

1. Setup cpuset
mkdir /dev/cpuset
mount -t cgroup -ocpuset cpuset /dev/cpuset


2. Create a new cpuset
mkdir /dev/cpuset/mycpuset


3. Assign CPU to it
echo 1 > /dev/cpuset/mycpuset/cpuset.cpus


4. Assign Memory Node to it
echo 1 > /dev/cpuset/mycpuset/cpuset.mems


5. Assign the kvm tasks(processes)
First find out the process id of qemu-kvm.
cat /var/run/libvirt/qemu/fedora13.xml |grep pid
<domstatus state='running' pid='4305'>
<vcpu pid='4306'/>
Then add all the above process ids to the cpuset:
echo 4305 > /dev/cpuset/mycpuset/tasks
echo 4306 > /dev/cpuset/mycpuset/tasks

Wednesday, August 4, 2010

KVM: Install and run KVM on Ubuntu 10.04 64-bit

Install Ubuntu 10.04 64-bit, choose only "OpenSSH" server at install.

Login and Promote yourself to root:

sudo su

Check if your computer has Virtualization Friendly CPU:

egrep '(vmx|svm)' --color=always /proc/cpuinfo

Install necessary software (KVM, libvirt, virt-install, etc)

aptitude install -y ubuntu-virt-server python-virtinst virt-viewer

This will take care of most stuff, including a network bridge, libvirtd, etc.

Optional: To put the VMs in the same subnet as the host, you need to bridge your network (not using the virbr0 that was provided by libvirt).

The following script will do it if eth0 is your NIC to the subnet, and you have DHCP.

cp /etc/network/interfaces /etc/network/interfaces.bk

cat > /etc/network/interfaces <

# This file describes the network interfaces available on your system
# and how to activate them. For more information, see interfaces(5).

# The loopback network interface
auto lo
iface lo inet loopback

# The primary network interface
auto eth0
iface eth0 inet manual

auto br0
iface br0 inet dhcp
bridge_ports eth0
bridge_fd 9
bridge_hello 2
bridge_maxage 12
bridge_stp off
EOF

Restart network:
/etc/init.d/networking restart

3. Now we install a Ubuntu10.04 Client:
Prepare a directory for the new VM

mkdir ubuntu_10.04_64_base_kvm
cd ubuntu_10.04_64_base_kvm
wget http://mirrors.login.com/ubuntu-iso/lucid/ubuntu-10.04-server-amd64.iso

virt-install --connect qemu:///system -n ubuntu_10.04_64_base_kvm -r 1024 --vcpus=1 --os-type=linux --os-variant=virtio26 -b virbr0 --arch=x86_64 --disk path=./ubuntu_10.04_64_base_kvm.img,size=20 --vnc --accelerate --disk path=./ubuntu-10.04-server-amd64.iso,device=cdrom


Monday, April 19, 2010

Network Performance Test Xen/Kvm (VT-d and Para-virt drivers)

Para-virtualized Network Driver
Note: In case [1] and [2] the numbers are greater than the speed (1Gbps) of the NIC since the client is communicating with the server via the Para-virt driver (for KVM and Xen) or via loopback link (Native).

Passing a NIC to Guest Via VT-d


Summary of Results:
  • One should use Para-virtualized drivers
  • KVM and XEN have close network performance for both VT-d and Para-virt.
  • The MAX bandwidth of Virtio connecting to a remote is very close to VT-d or Native
  • Using Para-virt to connect to Dom0 is much faster than using VT-d

Type of Setup:

VT-d (e1000 PCI Passthrough)
Passing a e1000 NIC from host to guest via VT-d. Need to be specified at virt-install "--host-device=pci_8086_3a20" (otherwise you need to handle the complex pci driver loading/unloading), where "pci_8086_3a20" is the name of the NIC. Use lspci -v and virsh nodedev-list to see them.

KVM: Virtio
Using the virtio_net driver, set in libvirt xml file, which produces a "-net nic,macaddr=xxx,vlan=0,model=virtio" in kvm arguements.
Note: to load the virtio_net driver correctly in SLC5 DomU (guest) one need to remake an initrd image like below:
mkinitrd -f --with=virtio --with=virtio_pci --with=virtio_ring --with=virtio_blk --with=virtio_net initrd-2.6.18-164.15.1.el5.virtio.img 2.6.18-164.15.1.el5

XEN: xen_vnif
Using the xen_vnif driver.

Native (Run in Dom0 - e1000)
This is the control setup, in this case all test commands are run within Dom0 (the host computer).


Server Command:
iperf -s -w 65536 -p 12345

Client Command:

[1] Link to dom0
iperf -c dom0 -w 65536 -p 12345 -t 60

[2] Link to dom0 with 4 spontaneous threads
iperf -c dom0 -w 65536 -p 12345 -t 60 -P 4

[3] Link to a remote box on the same switch
iperf -c remote -w 65536 -p 12345 -t 60 -P 4

[4] Link to a remote box on the same switch with 4 spontaneous threads
iperf -cremote -w 65536 -p 12345 -t 60 -P 4

CPU Performance Xen/Kvm


Summary:

  • For KVM,there is little performance penalty for CPU.
  • XEN performs worse, maybe optimizations in configuration can be made?
Test Setup:

Xen: 7GB memory, 8 VCPU
KVM: 8GB memory, 8 VCPU
Native: 8GB memory, 8CPU

Test command:
nbench -v

KVM Disk Performance with different configurations


Summary:
  • Using a block device as vda and apply the virtio_blk driver is the fastest
  • There is still a 5-10% penalty on both read and write.
Test Setup:

KVM: 8GB memory, 8 VCPU
Native: 8GB memory, 8CPU

Test command:

bonnie++ -s 24576 -x 10 -n 512

Disk Performance Xen/Kvm with LVM and Para-virt drivers


Summary:
  • For KVM, there is a 5-10% penalty on both read and write.
  • For XEN, the penalty is much larger for read/write, but seek time is better.
Test Setup:

Xen: 7GB memory, 8 VCPU
KVM: 8GB memory, 8 VCPU
Native: 8GB memory, 8CPU

Test command:

bonnie++ -s 24576 -x 10 -n 512

Tuesday, April 13, 2010

Network Speed Test (IPerf) in KVM (Virtio-net, emulated, vt-d)


Note: Some of the numbers are too big, so the numbers on top of the bars shows their actual number. So they won't mess up the scale.

Summary of Results:
  • One should use Virtio in favor of VT-d pass-through, or emulated Network Driver
  • Emulated NICs are much slower than Virtio or VT-d
  • The MAX bandwidth of Virtio connecting to a remote is very close to VT-d or Native
  • Using Virtio to connect to Dom0 is much faster than using VT-d (since in our setup VT-d is a second NIC)

Type of Setup:

[a] Emulation (rtl8139)
Emulating an rtl8139 100Mbps-NIC, this is the default if you don't change anything with virt-install. (I.E. eucalyptus might get this one).

[b] Emulation (e1000)
Emulating an e1000 1Gbps-NIC, set in libvirt xml file, which produces a "-net nic,macaddr=xxx,vlan=0,model=e1000" in kvm arguements.

[c] VT-d (e1000 PCI Passthrough)
Passing a e1000 NIC from host to guest via VT-d. Need to be specified at virt-install "--host-device=pci_8086_3a20" (otherwise you need to handle the complex pci driver loading/unloading), where "pci_8086_3a20" is the name of the NIC. Use lspci -v and virsh nodedev-list to see them.

[d] Virtio
Using the virtio_net driver, set in libvirt xml file, which produces a "-net nic,macaddr=xxx,vlan=0,model=virtio" in kvm arguements.
Note: to load the virtio_net driver correctly in SLC5 DomU (guest) one need to remake an initrd image like below:
mkinitrd -f --with=virtio --with=virtio_pci --with=virtio_ring --with=virtio_blk --with=virtio_net initrd-2.6.18-164.15.1.el5.virtio.img 2.6.18-164.15.1.el5

[z] Native (Run in Dom0 - e1000)
This is the control setup, in this case all test commands are run within Dom0 (the host computer).


Server Command:
iperf -s -w 65536 -p 12345

Client Command:

[1] Link to dom0
iperf -c dom0 -w 65536 -p 12345 -t 60

[2] Link to dom0 with 4 spontaneous threads
iperf -c dom0 -w 65536 -p 12345 -t 60 -P 4

[3] Link to a remote box on the same switch
iperf -c remote -w 65536 -p 12345 -t 60 -P 4

[4] Link to a remote box on the same switch with 4 spontaneous threads
iperf -cremote -w 65536 -p 12345 -t 60 -P 4

Thursday, March 25, 2010

KVM: How to Setup KVM on Scientific Linux 5.4 (RHEL54) 64-bit

1. Install SL5.4 x86_64, choosing only GNOME Desktop in the software list;

2. login as root, install the necessary packages

yum upgrade
yum install -y kvm virt-manager libvirt libvirt-python python-virtinst virt-viewer

3. Now we install a SLC54 Client:
  • Prepare a directory for the new VM
mkdir /scratch/SLC54_64_BASE_KVM
cd /scratch/SLC54_64_BASE_KVM
  • Download the SLC54 64bit network install disk
wget ftp://ftp.scientificlinux.org/linux/scientific/54/x86_64/images/boot.iso
  • Create a new VM with name "SLC54_64_BASE_KVM", and a 20GB disk image
virt-install --connect qemu:///system -n SLC54_64_BASE_KVM -r 512 --vcpus=1 --os-type=linux -b virbr0 --arch=x86_64 --disk path=./SLC54_64_BASE_KVM.img,size=20 --vnc --accelerate --disk path=./boot.iso,device=cdrom
  • Now the new VM will boot just follow the instructions to install it

XEN: How to Setup Xen on Scientific Linux 5.4 (RHEL54) 64-bit

1. Install SL5.4 x86_64, choosing only GNOME Desktop in the software list;
2. login as root, install the necessary packages

yum upgrade
yum install -y xen kernel-xen virt-manager libvirt libvirt-python python-virtinst virt-viewer


3. Restart computer and make sure the Xen kernel is booted.

4. Now we install a SLC54 Client:
  • Prepare a directory for the new VM
mkdir /scratch/SLC54_64_BASE_XEN
cd /scratch/SLC54_64_BASE_XEN
  • Download the SLC54 64bit network install disk
wget ftp://ftp.scientificlinux.org/linux/scientific/54/x86_64/images/boot.iso
  • Create a new VM with name "SLC54_64_BASE_XEN", and a 20GB disk image
virt-install --connect xen:///system -n SLC54_64_BASE_XEN -r 512 --vcpus=1 --os-type=linux --os-variant=rhel5 -b virbr0 --arch=x86_64 --disk path=./SLC54_64_BASE_XEN.img,size=20 --hvm --vnc --disk path=./boot.iso,device=cdrom

Now the new VM will boot just follow the instructions to install it